Leave the scissors and glue behind and discover some of the extraordinary things you can do today with a program like Photoshop Elements.
Although Photoshop Elements is a stripped-down version of its big sister program Adobe Photoshop, it’s still a powerful tool. You’ll find everything you need to crop, edit, and restore images in the palettes, panels, and menus.
Where do you start? With this quick tour of the program designed to give you a general understanding of how things work and get you started editing your own photos. If you’re looking for instructions on how to use the Adobe Photoshop Save for Web dialog to create JPEGs, GIFs, and PNG files, click here.
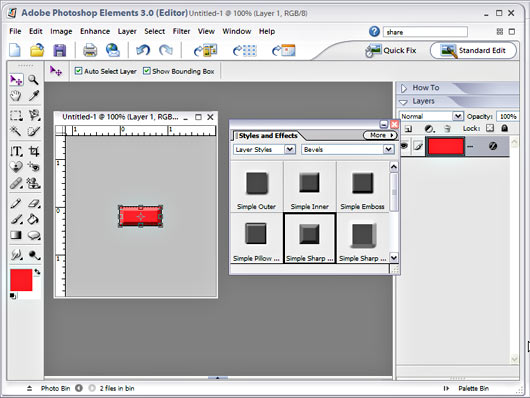
The workspace, shown here, has many tools and palettes — your first challenge is to identify the ones that you want to work with (and ignore the rest, at least until you need them for more advanced techniques).
To help you get familiar with the program, this section introduces you to the four primary components of the workspace: the toolbox, options bar, menu bar, palettes.
The Toolbar
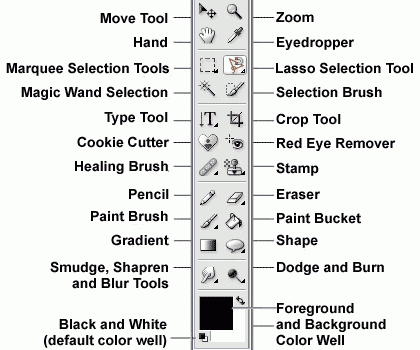
The Photoshop Elements Toolbar has 22 icons, plus a color picker. You can use these tools to make many alterations to an image, including copy, crop, and retouch images, select portions of an image, paint in the image, and enter text.
All the Tools You Need: Every icon in the toolbar represents a different tool with a special action in Photoshop Elements. Just select the tool you want to paint, type, crop, or do anything else you want to your images.
More Tools When you Click
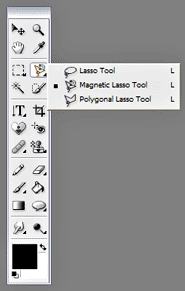
Some buttons feature related tools. Just click on the small triangle icon in the lower-right corner to reveal the fly-out menu. Then click on the tool you want to use.
The Lasso Tools and the other selection tools can be used to cut parts out of an image so that they can be combined to create new images.
The Options Bar
Running across the top of the Elements workspace is the options bar. It changes depending on what tool you have selected and provides additional options. In this image you see the Options bar with the Text Tool selected. Use the drop-down lists, check boxes, and radio buttons, to change font, size, and other options for the selected tool.
For example, when the paint brush tool is selected, you can change the size and shape of the brush. Switch to the text tool, and the options bar features font and size options, much like a toolbox in a word processor.
The Menu Bar
No program is complete without a menu bar. Just click the menu names and you can choose from a list of commands. If an ellipsis (…) follows the command name, the command launches a dialog box with additional options. Otherwise, the command kicks in automatically when selected.
If you do something to your image you don’t like, the greatest menu command ever created (for this program and any other) is Edit–>Undo. If you’re a keyboard shortcut fan, hold down the Control key and press the letter Z in a Windows computer (Command-Z on a Mac).
The Palettes Offer More Features
Photoshop Elements also features many floating palettes you can open when you need them, as well as docked palettes on the right site of the screen.
To open a palette, select its name from the Window menu. For example, Window–>Color Swatches opens a palette with color options. Note that each palette has a More button. Clicking More displays a list of additional commands.
Palettes can be left in their column on the right side of the workspace or dragged out into the workspace. In this example, a palette is being used to add a bevel to a small red rectangle. The effect is displayed in the Layers palette (one of the most important features in Photoshop, which is covered in more detail in other lessons).
Photoshop Elements has many tools — the trick is finding the features you need.
Download a Trial Version of Photoshop for free
Download a free 30-day trial version of Photoshop Elements to try out with this introductory lesson.


