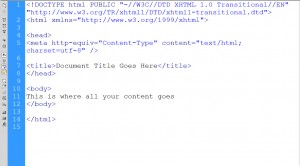
 Although you don’t have to learn HTML to create web pages in Dreamweaver, having a basic concept of how it works does come in handy.
If at first glance you think that XHTML code looks like hieroglyphics, don’t give up too quickly. With just a little training, you can start to recognize at least some common tags, like the <h1> tag (heading 1 tag) that was used to format the headline so that it displays in big bold text at the top of this page.
Here’s a short, crash course in HTML to get you started
Contrary to popular belief, HTML is not a programming language.
HTML a markup language: That is, HTML is designed to mark up a page, or you could say, provide instructions for how a web page should look when displayed in a web browser. (Discover why it’s important to test web pages in different web browsers.)
HTML is written by using tags, which serve as markup instructions that tell a web browser where to place all of the images, text, and other things on the page, and what fonts, colors, and other formatting to use.
For example, to apply italic formatting to text, you insert the HTML tag <em>. That may not seem like it would make text italic, but em stands for emphasis, and in most browsers, text formatted with the <em> tag is displayed in italics.
You need open and close tags to tell the browser where you want the italics to begin and end. (If you use a program, like Adobe Dreamweaver, when you click on the italics icon, Dreamweaver inserts both the open and close tags for you.)
For example, this code would make the title of my latest Dreamweaver book, display in italics:
<em>Dreamweaver CS6For Dummies.</em>
Most tags in HTML include both an opening tag and a close tag. Open tags look like this <open> and close tags include a forward slash, like this </close>. You’ll never use tags for open and close, but you can remember that the close tag is indicated by the forward slash / in the second of any pair of tags.
Open and close tags usually come in pairs and match, but there are exceptions.
Most notably, the break tag, which does not have an open and close tag, is written by itself like this: <br />
Similarly, the code used to insert an image on a page does not have a close tag, and is written like this:
<img src=”image-name.jpg” />
Don’t Delete the Space before the /
Note the space before the forward slash / should not be deleted from the br, img, or other tags that do not have a close tag.
The difference between HTML and XHTML
XHTML is a stricter version of HTML. XHTML has been the recommended language to use to meet the highest standards of web design. Among the differences between the two languages, XHTML must be written only in lowercase letters; in other versions of HTML, including the latest, HTML5, it doesn’t matter whether tags are upper or lowercase.
Similarly, XHTML requires that all tags include a close tag. Hence the previous examples, including <br />.
You can learn more in this article about HTML5, the latest flavor of HTML.
How to view the source code behind a web page:
- In most web browsers, you can choose View > Source; or use the Tools menu to select Source.
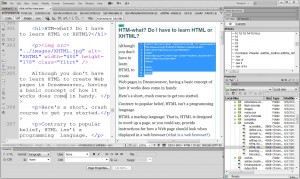
 If you’re using Dreamweaver, as shown in this figure, you can click the Split button (upper-left corner of the workspace) to see the code and the design areas at the same time.
Split view in Dreamweaver is a useful way to keep an eye on what’s going on behind the scenes and, as a bonus, you can learn a lot of XHTML as you go along.
If you select something in Design view, like the headline shown in this figure, the same text is highlighted in Code view, enabling you to easily find your place in the code.
Dreamweaver offers multiple View options:
* Code: In Code view, you see only the code.
* Design: In Design view, you see only the page as it should be displayed in a Web browser.
* Split: In Split view, the page is dived so you can see the code in one part of the workspace and a view of the how the page should be displayed in a Web browser in the other part.
* Live: Dreamweaver versions CS5.5 and CS6, include the addition of Live view, which changes the design area to display using webkit (the same engine used in the Chrome and Safari web browsers.) Live view enables the latest in CSS3 design features, such as rounded corners, to display in the Dreamweaver design area.
A few points to help you better understand HTML:
- HTML includes many tags that are designed to be hierarchical. Examples are the <h1> through <h6> (heading 6) tags, which are ideally suited to formatting text according to its importance on a Web page.
- Reserve the <h1> tag for the most important text on the page, such as the top headline. And if you want to make Google love you more, only use the h1 tag once per page.
- The <h2> tag is ideal for subheads or secondary headings and can be used multiple times. Similarly, <h3> is for the third level of headings, and so on.
A headline formatted with the <h1> tag looks big and bold like this:
<h1>This is a headline</h1>
- Some tags are more complex, and the open and close tags don’t always match. More complicated tags, such as the tags used to create links or insert images into pages, are more challenging to use because they include link information, and the close tag doesn’t always match the open tag
- For example, the code to create a link to another Web site looks like this:
<a href=”https://www.digitalfamily.com”>This is a link to DigitalFamily.com</a>
At its heart, HTML is just text, and believe it or not, you can write XHTML in a plain-text editor as simple as Notepad, SimpleText, or TextEdit. If you ever try it, however, you have to be careful to type all the code perfectly because there is no room for error or typos in HTML.
After writing code yourself, even to create a simple page, you’re sure to quickly appreciate how well Dreamweaver writes the HTML code for you.
