The tutorial that appears below is about creating your own form in Dreamweaver and using it with an email script hosted on your own server. When I wrote that tutorial a few years ago, using a script like this was one of the only ways to add forms to a website.
If you’re a programmer or a system administrator you probably don’t need my help, and if you’re not, you may be very frustrated with the process of trying to get an email script to work on your web host. That approach is also hard to teach, and hard to trouble shoot, because it depended on what kind of web server or host you were using, what script you have, and other variables.
Although many web hosting services still offer email scripts like the one I cover in my tutorial below, there are some alternatives today that are far simpler. Today the simplest ways to create forms for your website using Dreamweaver, WordPress, and any other program, is to us a forms service that takes care of all of the programming for you.
Here are two of the most popular ways to set up forms on a website (without needing programming skills):
When you use either of these online services to create a form, you create a form you can add to your website and you use a script that lives on their web server — and that removes most of the headaches when it comes to creating a wide variety of forms.
To use these services, set up an account, choose the type of form you want or create, and then copy and paste a little code into the HTML of your blog or your website. It’s that simple.
If you still want to learn how to use a simple email script on your own web server, you can learn the basics of that approach in the following tutorial.
Make Dreamweaver Forms work by connecting them to a CGI Script

One of the most confusing aspects of working with HTML forms is that they don’t do much until you’ve connected them to a script on your server. The HTML side of a form is relatively easy to create, and only a little more challenging if you want it to look good (see the tutorial on designing forms in the October/November 2006 issue of Layers Magazine).
Making your form look good is important, but if you want your form to actually do something, you’ll have to pair it with a program on your Web server as well. With the right programming, HTML forms can serve as search engines, shopping carts, guest books, and all the other interactive features web designers might imagine. But creating the programs that make these forms work requires programming knowledge that goes way beyond HTML.
Most forms are processed by Common Gateway Interface (CGI) scripts or some other dynamic programming. CGI scripts can be written in many different programming languages, including C, C#, Java, and Perl. CGI scripts are far more complex than the simple HTML files and even experienced Web designers often purchase third-party solutions or hire experienced programmers to develop CGI scripts for them, especially for complex features like discussion boards.
Fortunately for those of us who don’t have a computer science degree or huge budgets for programmers, there are many free scripts available on the web. Many service providers offer a collection of scripts as part of the features they include with hosting.
Search the web for CGI scripts and you’ll find an impressive collection of ready-to-use programs, many of them available for free. What’s the catch? You have to know how to configure and install them on your server. How you do that depends on how your server is set up.
I can’t possibly teach you everything there is to know about working with all the different kinds of scripts available on the web on all the different kinds of servers, but I will try to give you a flavor for what’s involved in working with CGI scripts and what you’ll need to do in Dreamweaver to make sure your HTML form will work with a script. To keep this lesson simple, I’ll use as an example one of the most common scripts available — formmail.pl. This clever little script is designed to collect data entered into an HTML form and send it to a specified email address. You can learn more about formmail.pl at www.scriptarchive.com (a great place to find lots of free scripts).
Every script is different, and the details of how you install and configure each script depend on the program and how your server is set up. This tutorial on how to use Dreamweaver with the formmail.pl script should give you a good introduction to how you would set up a form to work with any script.
If your service provider doesn’t offer a form mail script, you can download and configure the script yourself if you have the right access on your server and knowledge of how your server is configured. Ask your service provider for more info and if they don’t provide the interactive scripts you want, you may want to consider moving your site to a hosting service that does provide CGI scripts you can use.
Configuring Your Form to Work with a Script
In the October/November 2006 issue of Layers Magazine, you’ll find a tutorial on how to create the HTML form used in this tutorial. That article covers how to create and format an HTML with CSS and tables. This tutorial is designed to help you connect a form like that one to a script so that it will actually do something when a user clicks the submit button. Here’s what you’d do to connect a simple contact form to a formmail.pl script.
STEP 1
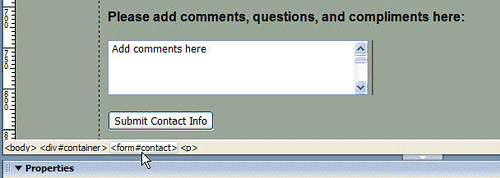
First, you’ll need to select the form tag that encloses your form. (Note: all HTML forms must be enclosed by the <Form> tag. If your script doesn’t have a form tag, you’ll need to add one around the entire contents of your form.)
Here’s a tip for selecting the form tag in Dreamweaver. Place your cursor anywhere in the body of your form, then use the tag selector at the bottom of the work area to select the form tag. Make sure you’ve selected the Form tag and not just one of the form elements, like the text box I created in this form for comments.
STEP 2
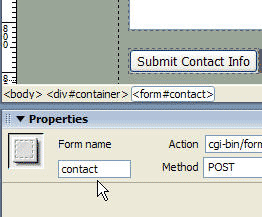
With the form tag selected, the Property inspector changes to feature the form tag options. First, you’ll want to give your form a name. Dreamweaver automatically gives each form you create a distinct name, like form1, form2, etc., but I prefer to change the name to something that has more meaning, like “contact” for this contact form. You can name your form whatever you like, just don’t use spaces or special characters.
STEP 3
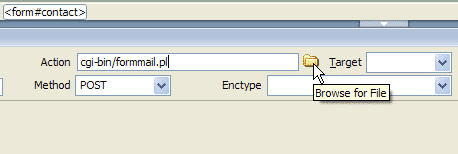
Next, you need to specify the Action for the form, which usually means that you need to include the URL or address where the script is located on your server. In this example, you can see that I’ve used the address, “cgi-bin/formmail.pl.” The address you enter will depend on your service provider, but it is a common convention to call the folder where CGI scripts are stored “cgi-bin.” The last part of the address (formmail.pl) is the name of the script. In this case, it’s a Perl script, indicated by the .pl.
Note: you can only use the Browse button (the yellow folder icon in the Property inspector) to automatically enter this address if you are working on your live server and Dreamweaver has identified the location of your script, or if you have the script on your local system in the same directory structure that exists on your server. In most cases, it’s simplest just to ask your service provider or programmer for the address and just type it into the Action field.
STEP 4
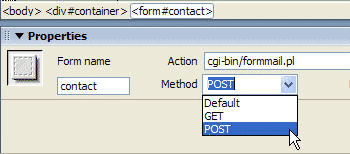
In the Method field, use the pull-down arrow to select Get, Post or Default. Again, this depends on your script, but Dreamweaver’s default is Post and if you’re using Formmail, the best option is usually Post.
STEP 5
Use the Target option to specify what the browser does when the submit action is completed. If you choose ” _top”, the results page will open in a new browser window. If you leave this field blank, the browser window will simply be replaced with the results page. A results page is usually a simple HTML page that is delivered when the Submit button is pressed with a message like: “Thanks for playing.”

STEP 6
The Enctype field enables you to specify how the data is formatted when it is returned. For example, if you’re using a form mail script this will determine how the text appears in your email when the contents of the form are sent to you. By default, enctype is set to “application/x-www-form-urlencoded.” However, if you’re using the form mail script, a better option is to enter the value “text/plain” by typing it into the Enctype field. This little detail means the difference between getting the form contents in one long line in an email, or having each field returned on its own line, which makes it much easier to read.
Note: using text/plain will result in a plain text email message, but at least the text will be displayed like this:
First-Name=Janine
Last-Name=Warner
Email=janine@jcwarner.com
Instead of looking something like this: First-Name=Janine, Last-Name=Warner, Email=janine@jcwarner.com

STEP 7
The class field at the far right of the property inspector enables you to apply CSS to the form. In this example, I applied CSS to some of the elements in the form, such as the text, but not to the entire form.
That takes care of all of the options in the Property inspector. You’ll still need to insert a hidden form field into this form to make it work with the formmail.pl script.
STEP 8
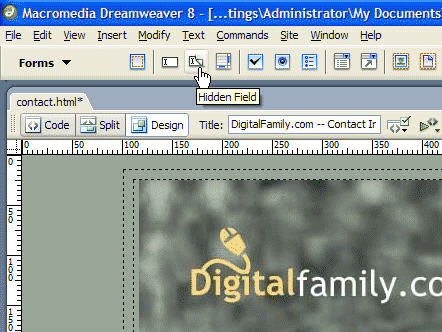
Use the Form Insert Menu at the top of the workspace to access the form options and click to select the Hidden Field icon. Note: make sure your cursor is within the form tag when you add the hidden field. Placing your cursor at the top or bottom of the form is a good option.
STEP 9
When you insert a hidden field, you won’t see it in the design area of the page, but the Property inspector will change to feature the hidden field options. First, enter a name. If you’re using formmai.pl, you’d enter “recipient” as the name and the email address where you want the form data sent as the value. You can even enter more than one email address, separated by commas. So, for example, I could enter “janine@jcwarner.com, janine@digitalfamily.com” in the value field and the data from the form would be emailed to both of my email addresses at once when a user hits the submit button.

STEP 10
There are many other hidden fields you can add to a form, depending on the script you are using and how much you want to customize the results. For example, you can add a hidden field with the value “subject” and include a subject line you would want inserted into the email message automatically when a user submits the form. In this example, I entered “Contact Information from DigitalFamily.com,” as the value.

And that’s it. Assuming all of the fields are filled in correctly and the script is properly installed and configured on my server, I should receive two email messages with the contents of the contact form when a user fills it in and submits on my site.
There are so many reasons to create forms on the Web, but emailing the contents of a contact form is one of the most common. I hope this little exercise has helped to give you an idea of what you need to do to make your HTML forms interact with a CGI script on your server.
Remember, most service providers offer a collection of scripts you can use for common tasks like discussion boards, guest books, and more. All you should have to do is create the HTML part of the form and then specify the form fields to interact with your script.
Originally written for Layers Magazine, October 20th, 2006

Hi Janine.
I am trying to set up an email form for my website: http://www.jmworks.co.za
I followed your Dreamweaver CS3 instructions and hope it works.
After I created the form in Dreamweaver, must I phone my service provider to activate the cgi script?
Looking forward to your reply.
Regards
Johan meyer
If you want to use your own HTML form, you’ll need some kind of script on your server to process it. Some service providers offer this service, but others do not. That’s why so many people use Adobe Forms Central or another form service, such as the ones I included in this article.
Also note that instructions written for Dreamweaver CS3 are now quite outdated. The instructions included in this lesson, as well as in my books and videos on version CS3, were more appropriate a few years ago when CS3 first came out.
Im trying to have a form that has both a submit button which will submit the data in the for to a .php database, and a email button that will submit the data in the form to a cgi script which formats the data and sends a email. When I have the email butting by itself it works fine, but when I add a submit button, it only submits the data to the .php database, but the email button does not work. I would like to get both working.
Thanks in advance for your help.
-Gregg
Thanks for the articles. This is the second one I’ve found helpful.
However.
I checked the Adobe Forms Central. Another pay site. Adobe has found yet one more way to wheedle money out of people who bought their products like CS6 because they didn’t include easy-to-use functionality in CS6 Master Collection ($600 for the upgrade). Same as when I bought WOW Slider to create slide shows in 5 minutes. Another fee. Same as when I had to hire someone to add PHP and database functionality to a site.
After a while I get the feeling Adobe thinks I’m an ATM for them. Especially now that they’ve gone to a subscription business model for their CS products, which costs more that straight upgrades.
I’m getting to the point where I hate Adobe and won’t be spending anymore money on them.
Hi Hidalgo,
I’m glad you’ve found my articles helpful. I don’t work for Adobe and I don’t have any special influence over what they charge or what they include in their programs. If you want to inform them of your feelings, I would encourage you to post your comments on their forum.
Hi Janine
The person that built my website has disappeared and I can’t find anyone to help me change my email address contact from inside my Dreamweaver program. All I can find in the site pertaining to the email contact is under ASSETS, where there is a chain link icon listing a heap of You Tube http links and one that says: mailto:admin.nordenstamm.org…MAIL TO
This admin address goes to gmx email address that my husband has. We want to close this gmx account and go to gmail (as we have moved countries) but cannot do that unless I can change the admin address to point to a new email address. Which I cannot find inside my Dreamweaver site.
Any suggestions to help?
best regards
Alison
Hi !
First and foremost, thank you !
I’m learning and creating a new website. As you can see, I have to continue 🙂
I would you like to receive an email when someone click on “Envoyer”. (I’m french ^^).
My code is :
Nom :
Email :
Téléphone :
Message:
I included the script “formmail.pl” in the project, not in folder for the moment.
Do you know where is my error ?
Thank you in advance !
Best regards
Charles
In the script above, how can I make the second address bcc?
Thank yo for any help.
[…] Adding email forms, subcription forms, … – The tutorial that appears below is about creating your own form in Dreamweaver and using it with an email script hosted on your own server. When I wrote … […]