 You can show off your children, pets, or hobby on any computer — at home or at the office. The first thing to do is prepare your photos in digital format. You can download the photos from your digital camera, copy them from a CD, or scan them. Then just follow these simple instructions to create your own screensaver.
It’s easy to display wallpaper photos
If you already have some photos in a digital format, you can easily use one to create your own personalized wallpaper for your computer desktop.
1. Go to the My Documents folder on your computer. An easy way to get to the My Documents folder is to click Start (in the lower left corner of your desktop) and then click My Documents.
2. Open any folder of photos. Make sure the view is set for Thumbnails or Filmstrip. These settings enable you to see a small image of each photo. To change the view, choose the View menu at the top of the folder window and select Thumbnails.
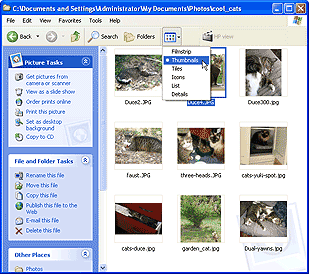
You can see small versions of your images when you change your folder settings to Thumbnails or Filmstrip.
3. Locate the photo you want to use as a background photo (wallpaper).
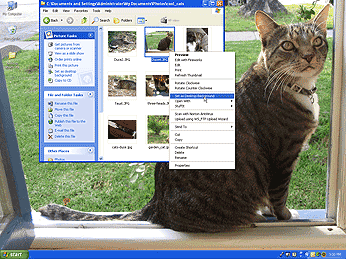
4. Right-click on the photo and choose Set as Desktop Background.
You can easily add an image to the background of your desktop to create your own wallpaper.
That’s all there is to it. The photo you chose should now be your wallpaper. When you want to change it, just follow the steps again and choose a different photo.
Creating your own slide show for a personalized computer screen saver
A screen saver of your own photos is another great way to show off your children, pets, or hobby on your computer at home or at the office. Creating a slide show to use as your screen saver enables you to put a whole selection of cherished images on view.
The first thing to do is gather the photos. You can download photos from a digital camera, copy them from a CD, or scan them if you have prints.
First: Save Your Photos in Their Own Folder
1. The first step is to put all of the photos you want in your slide show into their own separate folder. A good place to keep images is in the My Pictures folder inside the My Documents folder (these folders are usually available by default in Windows). An easy way to get to the My Documents folder is to click Start (in the lower left corner of your desktop) and then click My Documents. When the My Documents folder opens, double-click on the My Pictures folder to open it.
2. Create a new folder inside the My Pictures folder by choosing File, New, Folder. You can name the folder whatever you like, such as the date when you took the photos or the event where you took them, but it’s best to give it some easily identifiable name. For example“Family Reunion Screen Saver” or “Cool Cats Screen Saver.”
3. Next you need to copy all of the photos you want to use in your Screen Saver into your new folder.
Note: You can have as many photos as you’d like in your screen saver, but five to ten is usually more than enough. Remember, you can always add more and you can change them whenever you have new ones you’d like to use.
4. Let’s assume you called your new folder “Cool Cats Screen Saver” and you want to include a bunch of photos you’ve taken of your cats that are already in your My Pictures folder. Look through all of the photos of your cats, and when you see one you want to use, right-click on it and choose Copy.
5. Then open the Cool Cats Screen Saver folder, right-click, and choose Paste. The photo is now in the Cool Cats Screen Saver folder and ready to be included in your new screen saver.
6. Repeat steps 4 and 5 to copy all of the photos you want to use into your new “Cool Cats Screen Saver” folder.
Note: If the photo you want is sideways, right-click on it and chooseRotate Clockwise or Rotate Counter Clockwise so it will appear right-side-up in your screen saver.
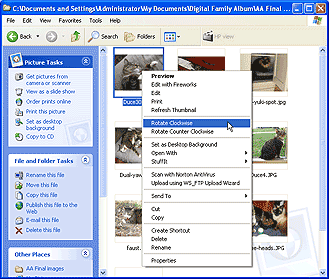
Before you create your screensaver, make sure all your images are vertically aligned.
7. Once you have all of the photos you want in your new folder, you’re ready to create the screen saver.
Second, Set Up Your Screen Saver
Windows includes a built-in feature that makes it easy to create a screensaver for your computer.
1. Right-click on the desktop and choose Properties. (Your desktop is the main screen of your computer, which is visible when you first turn on your system.)
The Display Properties window will open.
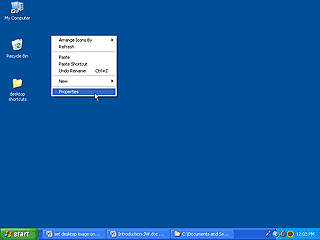
The Screen Saver option is available in the Display Properties.
2. Click on the Screen Saver tab at the top of the Display Properties window.
3. Under Screen Saver, click on the down arrow and choose My Pictures Slideshow.
4. Next to the box that says My Pictures Slideshow, click on the Settings button. The My Pictures Screen Saver Options dialog box will open.
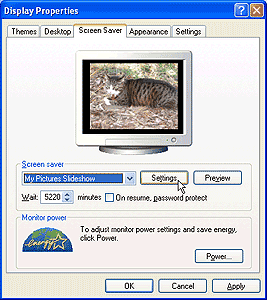
The Settings button reveals Screen Saver Options.
5. To select your images for the screen saver, click on the Browse button in the Settings window. The Browse for Folder dialog box will open with the message “Choose a directory from which to display images.” You should see a list of folders that are in your My Documents folder.
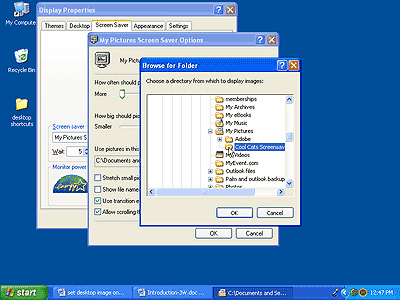
Use the Browse option to select the folder with your screen saver images.
6. Click the plus sign next to any folder to reveal its contents and then click to select the folder with the images for your screen saver. In my example, I opened the My Pictures folder by clicking on the plus sign and then selected the Cool Cats Screen Saver folder.
Note: You can control how often the pictures should change and how big they should be by adjusting the sliders in the Settings window.

You’ll find many options in the Settings window.
7. In the Settings window, move the sliders to specify how fast images should transition and how large they should appear on your screen.
8. At the bottom of the Settings window are four items with check boxes next to them: “Stretch small pictures,” “Show file names,” “Use transition effects between pictures,” and “Allow scrolling through pictures with the keyboard.” To select an option, click to add or remove a check mark. In general, I recommend the “Use transition effects…” option because it makes the slide show look better as the images change, and the “Allow scrolling…” option because you can then move through the images manually as well as having them automatically play on your screen.
9. Click OK at the bottom of the dialog box to return to Display Properties. The computer at the top of the Display Properties window will show a preview of your screen saver.
10. In the Display Properties window, next to the option marked “Wait,” you can adjust the number of minutes your computer should be inactive before the screen saver starts playing. Click the up or down arrow to change the number of minutes. If you choose four minutes, for example, the screen saver will begin playing four minutes after you stop actively using your computer (meaning you don’t use the mouse or keyboard for four minutes).
11. Make sure you don’t see a check mark in the box next to “On resume, password protect,” unless you are sure you want to use a password.
12. The Monitor Power settings are advanced options that enable you to specify the power options for your monitor, but you don’t need to change these when you create a screen saver.
13. After you’ve completed all of the settings you want to adjust, click OK at the bottom of the dialog box.
Congratulations! Your screen saver is ready. If you don’t touch the mouse or the keyboard for four minutes, you should start seeing the photos you selected. This is a great time to take a break from your computer, stretch, get up and walk around, or go visit a friend or family member and tell about them the cool project you just created.

Thank you, I have spent many days trying to do just that to no avail. Your instructions are very clear and easy for a non-computer minder like me. I did not grew up in the computer era but in the manual typewriter one.
First thing I ever typed on was a manual keyboard. And I’ve got the memory of a sprained pinky trying to make the “A” key work to prove it! Glad the tutorial helped.
What about the issue of pixillation? It seems most photos end up looking pretty lousy when enlarged to a 17″ (or larger) screen. Any tips about this issue? Thank you.
Hm. Depends on the resolution of the original photo. If you’re getting pixillation, that says to me that the original was too small. Find a larger version – or consider “up-rezzing” the photo. That would be importing it into a photo-editing program and then changing the “Image Size” to the actual number of pixels that your screen is going to display. Or – and this is a bit more complex – you can take a small, tiny, photo and get all “artsy” with it. As in, convert it to a vector graphic, that retains its characteristics no matter how big you blow it up. That would require Illustrator and using the “raytrace” function, and tends to distort the image, but can result in fun & funky results (like the iconic “Hope” and “Change” images of Obama).