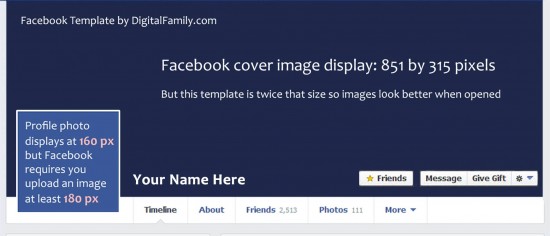
Bigger than you might think.
Template design last updated 3-2014

Facebook-Template- Updated 3-2014
Click to view template’s actual size. Your images will be displayed at half this size in your Timeline, but will be shown in the larger version in other areas of Facebook.
Why bigger photos are better in Facebook cover designs (free template & tips to prove it)
After considerable testing, I’ve found that profile photos are displayed at 160×160 pixels at the top of your main profile page — as they are in every Facebook template I’ve ever found on the Web.
However, if you try to upload a profile photo that’s 160 pixels wide, you’ll receive a Facebook error stating that your profile image must be at least 180 pixels wide. Confusing, right?
Here’s the deal – You can’t upload profile photos that are smaller than 180 pixels, but you can upload images that are larger.
For best results, upload images that are bigger than recommended
Most of the advice you’ll find about Facebook’s cover images is even more confusing. Facebook’s Help files (and most templates) state that your cover image should be exactly 851 pixels wide by 315 pixels tall.
But larger is better because when you click on a cover photo and the image opens in a new window over the profile page, your photo is displayed in its actual size (or as close to full size as the space in your browser window allows). And bigger images definitely look better on the giant monitors so many of us use.
Here’s what I found:
If you upload a cover image that is smaller than 851×315 pixels, Facebook will stretch it to fit the display area. If you upload a cover photo that’s larger than 851×315 pixels, Facebook will reduce the image so that it fits in your profile page, and you’ll have the benefit of the larger size when someone clicks on it.
Note: For best results, keep your cover image the same aspect ratio as the recommended 851×315 or it will get cropped to fit.
Warning: The most limiting factor when it comes to design cover images is that you need to keep the total file size of each image less than 100 KB. If the file size is larger, Facebook will compress it for you, and you’ll almost certainly get better results if you optimize your images using the Save for Web dialog in Photoshop.
How to use this Facebook Timeline template
The template is designed to serve as a guideline to help you get your photos into the correct sizes and see how they fit together.
- Download the template in the format you prefer using the links below.
- Open the template in Photoshop, Photoshop Elements, or your favorite image editor.
- Open any image(s) you want to use in your Timeline and copy and paste them into the template.
- Resize and adjust your images, using the template as a guide for how they will fit together on Facebook.
- Once you get the images the way you want them, crop out each image separately (turning layers on and off as necessary).
- Export the smaller profile photo and the big cover image as two separate pieces (as jpegs) and upload those to Facebook.
- Note: You don’t need to resize your images before exporting them. If you design your page at the size of this template, Facebook will make them fit nicely in your profile.
Note: Profile photos display at 160-pixels wide, but Facebook requires that you upload a photo that is at least 180-pixels wide. Facebook accepts profile photos that are even larger, and they often look better that way, which is why this template is twice the size of most Facebook templates.
Download Facebook Timeline Template
To save the jpeg version above
Click on the template image at the top of this page to open the full size version, then Right-click (option-click on a Mac) and choose Save Image
